Who can modify this Feature?
- Partner
- Company Admin
- Network Admin
- Meter Support
What is iPSK?
Identity Pre Shared Key (iPSK) allows you to configure a single SSID with multiple unique passwords. Each password can be assigned to a specific VLAN, enabling dynamic network segmentation for different users or devices, all from one SSID.
This feature simplifies network design by replacing the need for multiple SSIDs with one unified SSID using different PSKs for different groups or use cases.
It is optionally possible to restrict each PSK to some MAC addresses. If no MAC address is provided, all users will be able to connect with that PSK; when MAC addresses are provided, only these MAC addresses are allowed.
How iPSK Works?
When a client connects to an SSID using iPSK, the system matches the password entered by the client with the list of configured PSKs. If there is a match, no MAC restriction, or if the MAC address of the client is in the list of allowed MAC addresses, the client is granted access
Requirements
- iPSK is only supported with WPA2 encryption: when iPSK is enabled, the SSID is automatically configured to use WPA2.
- If MAC restrictions exist, MAC randomization must be disabled on client devices to allow proper authentication.
How to Configure iPSK
- Log in to the Dashboard: https://dashboard.meter.com/
- Navigate to Wireless > SSIDs > Add SSID
- Configure SSID > Security > Security & VLANs
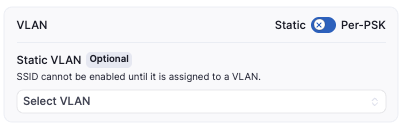
Enable Security and select the authentication iPSK 4. Under VLAN, you'll see the following two options
-
Static: dynamic VLAN is disabled, and VLAN is required to be assigned to the SSID
-
Per-PSK: dynamic VLAN is enabled
- Finish setting up your SSID as desired
Once saved, a “PSKs” tab will appear under the newly created SSID page.

Add a PSK Entry
- Navigate to the SSID > PSKs > [Your SSID] > PSK
- Click Add PSK
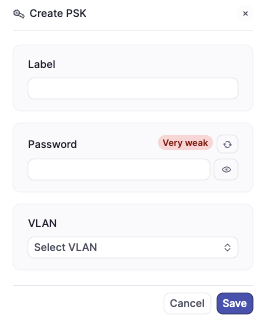
- Label - name for identification (e.g., "Engineering", "IoT", "Guest")
- Password - enter a custom password or allow the Dashboard to generate one
- VLAN - select which VLAN this PSK should be bridged to
- Hit Save
You can now share the appropriate password with users/devices assigned to that role.
If you have any questions about iPSK or need further assistance, feel free to contact Meter Support at support@meter.com or submit a ticket at meter.com/support.